 Welcome to the Creative Charms Blog Hop! If you happened to just stop by and weren't hopping but would love to join in, be sure to start the hop at the Creative Charms Blog to start your journey. At each blog you will find a word. When you reach the end of the blog hop, email Midori (midori at creative charms dot com) with the secret phrase for your chance to win both the May Kit of the Month and Deal of the Month. The winner will be drawn by Midori on Monday morning. I have enjoyed my time on the Creative Charms team and am excited to see what the new team comes up with on the Creative Charms blog each day.

My word is "blog." Now hop on over to Michelle's blog!
Supplies I used on my most favorite project during my time on the team:
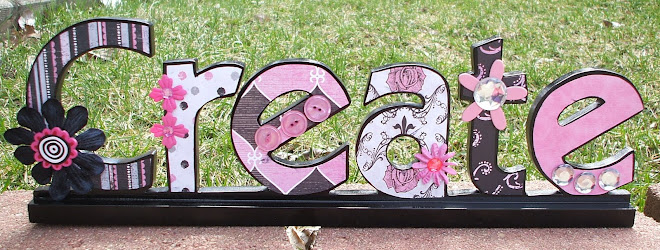
My Mind's Eye Meadowlark Collection
Creative Charms Vintage Poppies with Pearl Brads (Black)
Creative Charms Vintage Marble Brads (White)
Creative Charms Gradient Pearl Stickers (White)
Creative Charms Sheer Flowers with Iridescent Pearls (Black)
Creative Charms Monarch Butterfly (Black and White)
Pressed Petals Chip Chatter Chipboard Letters


 After tracing and cutting out the letters (you may need to do a little trimming), it’s time to crinkle your paper. If you don’t want such a rough looking crinkle you can spray with water first or even iron some of the wrinkles out. You then take your ink pad to the wrinkles and add ink to the edges and wrinkles. I also rubbed my ink pad around the edges of the letters on my sign so everything would blend into the bright white sign better. To adhere I recommend an extra sturdy tape such as Therm O’ Web Super Tape. I then added some of the coordinating Grand Adhesions Halloween Stickers to the sign.


 On my second card I once again reached for the Gradient Gem Stickers and also added one of the super cute Flower Brads. I consider myself a simple project kind of girl most of the time and I love how gems can give your project that extra oomph!
  Blue Kit:
  Pink Kit:


